The form factor of your motherboard determines its physical size, the number of expansion slots and memory slots it has, and which cases it will fit in. Choosing the right form factor is the first decision in any PC build, because it dictates the size and type of case you need, and how much room you will have for components.
| Form Factor |
Dimensions |
PCIe Slots |
RAM Slots |
Typical Use |
| E-ATX |
305 x 330mm |
7 |
4-8 |
Workstation, enthusiast |
| ATX |
305 x 244mm |
7 |
4 |
Gaming, general use |
| Micro-ATX |
244 x 244mm |
4 |
2-4 |
Compact builds |
| Mini-ITX |
170 x 170mm |
1 |
2 |
Small form factor |
Form Factor Compatibility Rule
Your case must support your motherboard's form factor. ATX cases can fit ATX, Micro-ATX, and Mini-ITX boards. Micro-ATX cases fit Micro-ATX and Mini-ITX. Mini-ITX cases only fit Mini-ITX.
Here is a quick compatibility matrix showing which motherboard form factors fit in which case sizes:
| Case Size |
ATX Board |
mATX Board |
Mini-ITX Board |
| Full Tower |
Yes |
Yes |
Yes |
| Mid Tower (ATX) |
Yes |
Yes |
Yes |
| Micro-ATX Case |
No |
Yes |
Yes |
| Mini-ITX Case |
No |
No |
Yes |
ATX Standard
ATX is the most popular form factor for gaming and general-purpose PC builds. It has been the standard since 1995 and continues to dominate because of its excellent balance between expansion options, component compatibility, and widespread case support.
- Dimensions: 305 x 244mm (12" x 9.6")
- Expansion: Up to 7 expansion slots
- Memory: Usually 4 DIMM slots
- Component variety: The widest selection of motherboards across all price ranges and chipsets
- Case compatibility: Fits in mid-tower and full-tower cases
- Best choice for first-time builders: Easy to work in, good component compatibility, and plenty of room for cable management
If you are unsure which form factor to pick, ATX is the safe default. The vast majority of PC building guides, tutorials, and troubleshooting resources assume you are working with an ATX board in a mid-tower case.
Micro-ATX
Micro-ATX (mATX) is the compact alternative to full ATX. It retains most of the functionality of ATX in a smaller, square footprint, making it a solid choice for builders who want a smaller PC without sacrificing too many features.
- Dimensions: 244 x 244mm (9.6" x 9.6") - square form factor
- Expansion: Up to 4 expansion slots
- Memory: 2-4 DIMM slots depending on the board
- Great for compact builds that do not need many expansion cards
- Fewer premium options compared to ATX - most manufacturers focus their flagship models on the ATX form factor
- Case compatibility: Fits in micro-ATX towers and larger
- Good balance of size and features for most users who only need a GPU and maybe one additional expansion card
Mini-ITX
Mini-ITX is the smallest mainstream motherboard form factor. It is designed for small form factor (SFF) builds where space is at a premium. Building in Mini-ITX requires more planning and careful component selection, but the result is a compact, portable system that can still deliver excellent performance.
- Dimensions: 170 x 170mm (6.7" x 6.7")
- Expansion: Only 1 expansion slot (for your GPU)
- Memory: Usually 2 DIMM slots
- Requires careful component selection - check clearances for CPU cooler height, GPU length, and PSU dimensions
- Higher premium for equivalent features compared to ATX and mATX boards
- Excellent for living room builds, portable setups, and desk-space-constrained environments
- Consider: Cable management is much harder in ITX cases due to the tight space
Warning
Mini-ITX builds require more planning than ATX. Check CPU cooler height, GPU length, and PSU form factor (some ITX cases require SFX power supplies). Verify all clearances before purchasing components, as returns due to incompatibility are common with SFF builds.
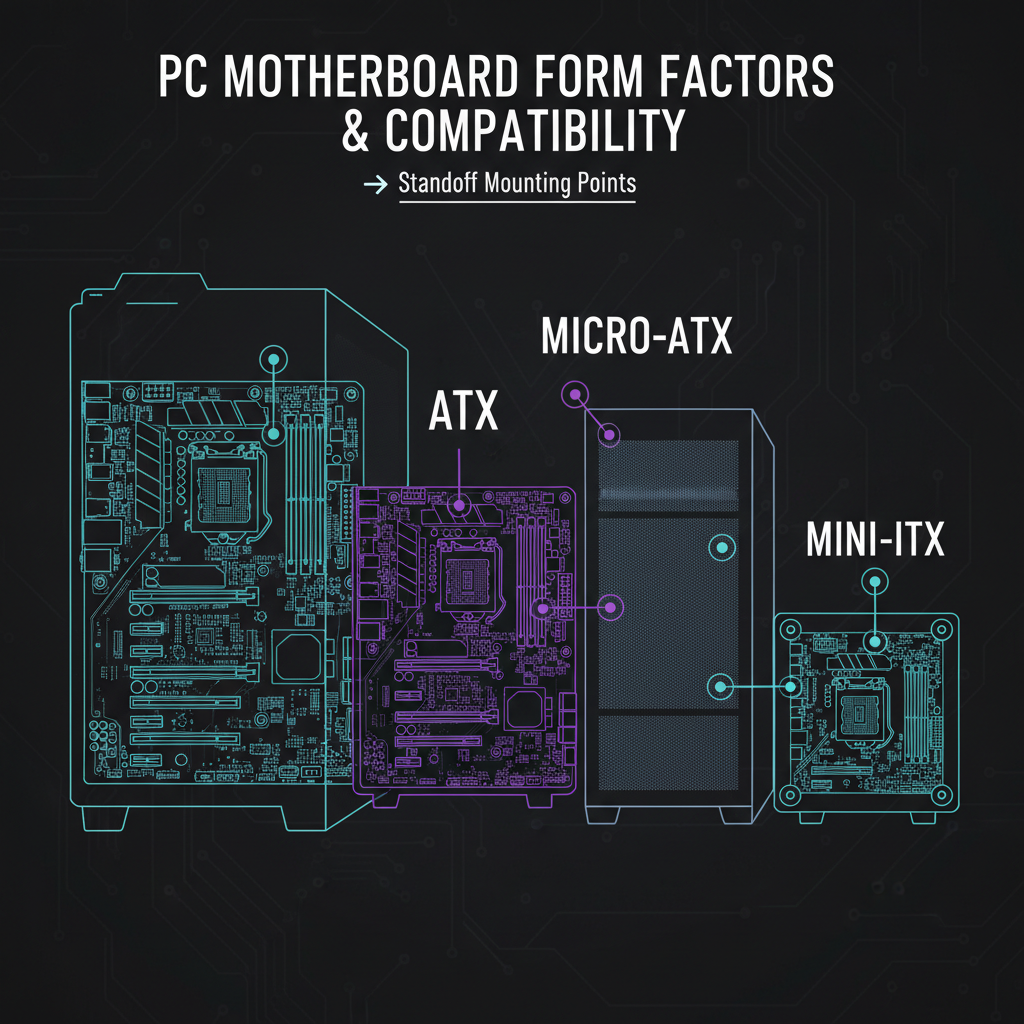
Standoff Mounting
Standoffs are a small but critical part of any PC build. They are the brass or steel spacers that create a gap between your motherboard and the metal case tray, preventing electrical shorts and providing secure mounting points.
- Standoffs are brass spacers that screw into the case tray's pre-threaded mounting holes
- The motherboard sits on top of the standoffs, then screws go through the board's mounting holes into the standoffs, securing the board in place
- They prevent the motherboard from touching the case directly, which would short-circuit the board and potentially damage components permanently
- Different form factors use different standoff patterns. ATX uses 9 standoffs, Micro-ATX uses 6-8, and Mini-ITX uses 4
- Most cases come with standoffs pre-installed for ATX mounting positions
- For Micro-ATX or Mini-ITX in an ATX case, you may need to move or remove standoffs that do not align with your smaller board's mounting holes
Warning
ALWAYS verify your standoffs match your motherboard's mounting holes. An extra standoff in the wrong position under the board can cause a short circuit and damage components. Before placing your motherboard, hold it over the case tray and visually confirm every standoff lines up with a mounting hole.
I/O Shield
The I/O shield is the metal plate that covers the rectangular cutout on the rear of your case where the motherboard's rear ports (USB, audio, Ethernet, video outputs) are accessible. It keeps dust out and provides a clean, finished look to the rear panel.
- Most modern motherboards have a pre-installed (integrated) I/O shield that is permanently attached to the board itself
- Budget boards may still use a separate snap-in I/O shield that must be installed into the case cutout before mounting the motherboard
- Install the I/O shield BEFORE mounting the motherboard in the case. If you forget, you will have to remove the motherboard to install it
- Ensure all port cutouts align properly with the motherboard ports when snapping in a separate I/O shield. The small metal tabs inside the shield should not block or bend into any ports
Tip
Motherboards with pre-installed I/O shields save a step and look cleaner. This is now standard on mid-range and higher boards. If you are buying a new board, look for an integrated I/O shield as a sign of build quality.
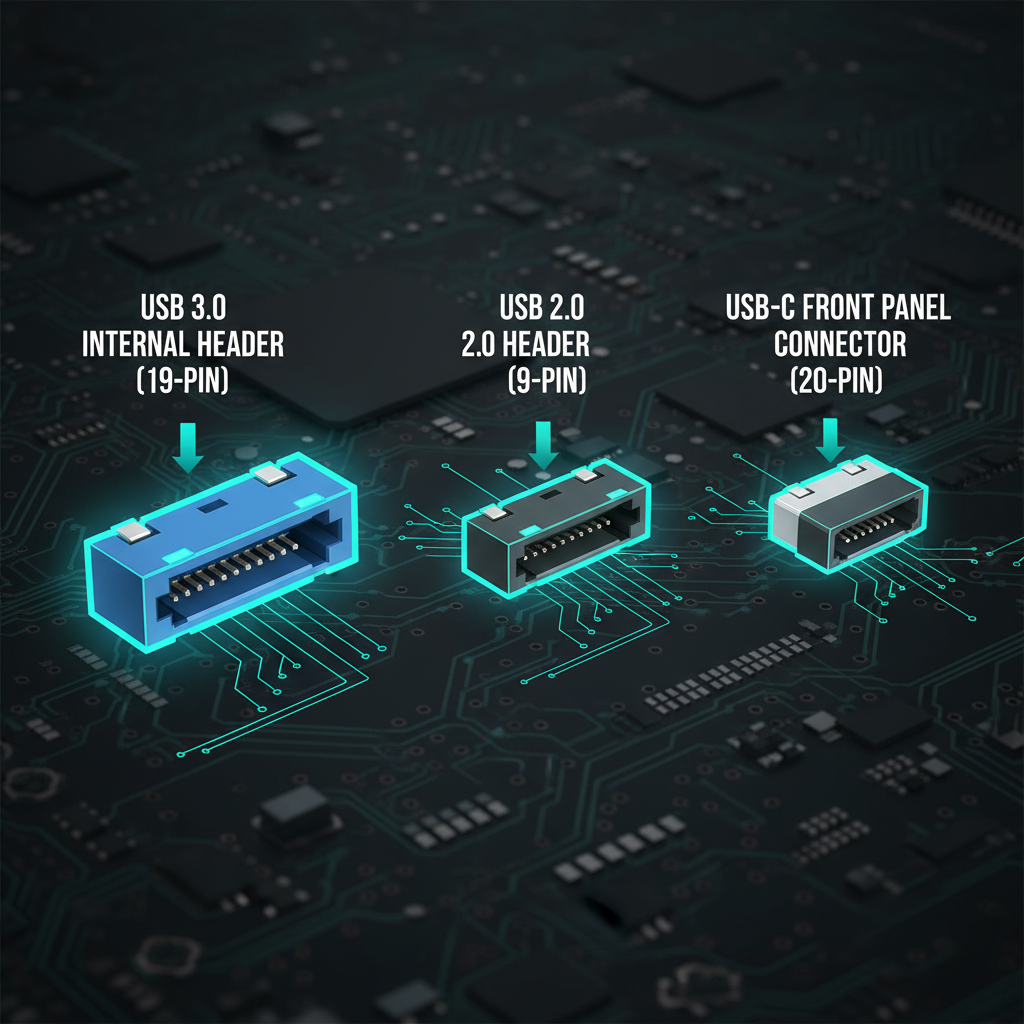
Front Panel Headers
Your case has front panel cables that connect to specific headers on the motherboard. These connections enable the power button, status LEDs, front audio jacks, and front USB ports. Here is what each cable does and where it connects:
- Power button / Reset button / Power LED / HDD LED: These tiny individual connectors go to the front panel header, which is located at the bottom-right corner of most motherboards. They control the case's power and reset buttons and the indicator LEDs.
- HD Audio: Connects to the audio header on the motherboard for front headphone and microphone jacks. This is a keyed connector that only fits one way.
- USB 2.0: A 9-pin header connector for front USB 2.0 ports. Usually located along the bottom edge of the board.
- USB 3.0: A 19-pin header connector (larger, usually blue) for front USB 3.0 Type-A ports. This is a bulky connector that requires careful alignment.
- USB-C: A 20-pin Key-A header for front USB Type-C ports, if your case has them. Not all motherboards include this header.
Front panel power and reset connectors are the most fiddly part of building a PC. These are tiny individual wires with small plastic connectors that must be placed on the correct pins in the correct orientation. Check your motherboard manual for the exact pin layout diagram. Some boards include a Q-connector adapter that lets you pre-assemble all the front panel wires outside the case, then plug in the assembled block in one step - this makes the process much easier.
Choosing a Case
With so many cases on the market, here is a step-by-step approach to narrowing down the right one for your build:
- Decide on form factor first. ATX is the right choice for most people. Only go smaller if you have a specific reason (space constraints, portability, aesthetics).
- Set a budget. $60-150 covers excellent options from all major manufacturers. You do not need to spend more unless you want premium materials or specific design features.
- Check max GPU length. Measure your graphics card (or check its spec sheet) and verify the case supports that length. Leave at least 10-20mm of clearance.
- Check max CPU cooler height. This is especially important for tower air coolers. Many mid-tower cases support coolers up to 160-170mm, but some compact cases are more restrictive.
- Count front panel ports. Make sure the case has the USB-A, USB-C, and audio ports you need on the front or top panel.
- Verify front panel USB headers match your motherboard. If the case has a front USB-C port, your motherboard needs a USB-C internal header. If the case has two front USB 3.0 ports, your board needs a USB 3.0 19-pin header.
- Consider airflow. Mesh front panels are far superior to solid or tempered glass front panels for cooling. Good airflow keeps your components running cooler and quieter.
- Consider cable management. Look for space behind the motherboard tray (at least 20-25mm) and rubber grommets or cable routing cutouts for clean cable runs.
Recommended Cases by Form Factor
ATX Budget: Fractal Design Pop Air, Corsair 4000D Airflow
ATX Mid-Range: Lian Li Lancool III, Fractal Design North
ATX Premium: Lian Li O11 Dynamic EVO, Corsair 5000D Airflow
Micro-ATX: Thermaltake S100, Cooler Master MasterBox Q300L
Mini-ITX: Cooler Master NR200P, NZXT H1 V2
Best Motherboards by Form Factor
Related Guides