Cooling & Thermals Guide
Understanding VRM cooling, fan headers, thermal management, and keeping your system running optimally
Understanding VRM cooling, fan headers, thermal management, and keeping your system running optimally
Thermal management is one of the most overlooked aspects of a PC build, yet it directly impacts every other component's ability to perform. When a CPU, VRM, or storage device overheats, the consequences are immediate and measurable: thermal throttling reduces clock speeds, system instability causes crashes and freezes, and prolonged exposure to excessive heat shortens the lifespan of silicon components.
Modern CPUs generate significant heat under load. High-end processors like the Intel Core i9-14900K can draw over 250W during sustained all-core workloads, and AMD's Ryzen 9 7950X can push past 200W. All of that electrical energy ultimately converts to heat that must be dissipated. But the CPU is not the only heat source on your motherboard -- the VRMs that power it, the chipset that manages I/O, and the NVMe SSDs that store your data all produce heat that needs to be managed.
A motherboard's cooling design directly affects how well it handles these thermal loads. Budget boards with poor VRM cooling may throttle power-hungry CPUs, negating the performance you paid for. Understanding what to look for in motherboard cooling helps you avoid these pitfalls and build a system that sustains its peak performance reliably over years of use.
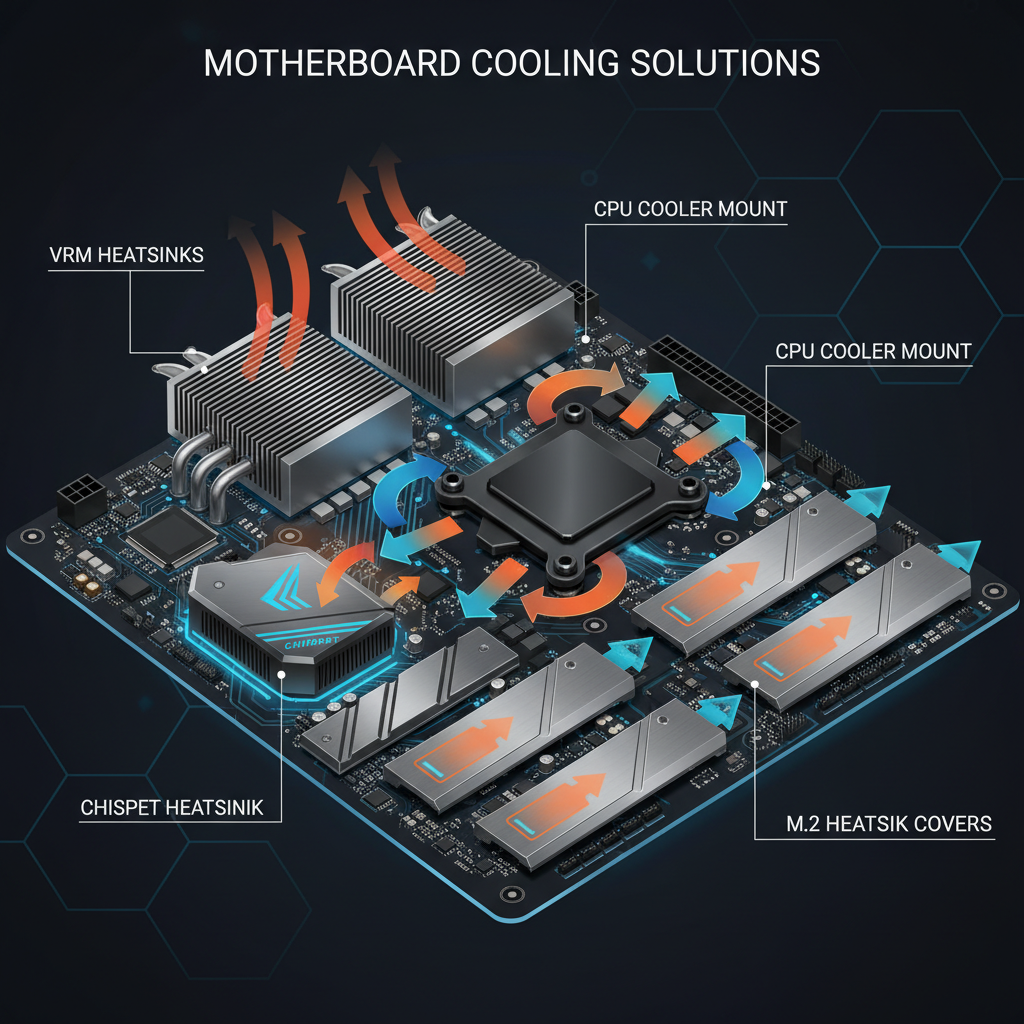
The VRM (Voltage Regulator Module) is responsible for converting your power supply's 12V rail down to the much lower voltage your CPU requires -- typically between 0.6V and 1.4V depending on the workload and processor. This voltage conversion process is inherently inefficient, and the energy lost in the conversion is dissipated as heat. The more power your CPU draws, the harder the VRM works and the more heat it generates.
Good VRM heatsinks are crucial for three reasons:
When evaluating a motherboard's VRM cooling solution, pay attention to these key indicators:
The number of power phases in a VRM design is a rough indicator of its capability. More phases distribute the electrical load across more components, reducing heat per component and improving overall efficiency:
| Tier | Power Phases | Typical Use | Example Boards |
|---|---|---|---|
| Budget | 4+1 to 8+1 | i5 / Ryzen 5 or lower | ASRock B760M Pro RS |
| Mid-Range | 10+1 to 14+2 | i7 / Ryzen 7 | MSI MAG B760 Tomahawk |
| High-End | 16+2 to 20+1 | i9 / Ryzen 9, overclocking | ASUS ROG Maximus Z790 Hero |
The notation "14+2" means 14 phases for the CPU core voltage and 2 phases for the SoC or auxiliary voltage. The first number is the most important for CPU power delivery.
Pairing a power-hungry CPU (like an unlocked i9 or Ryzen 9) with a budget motherboard can cause VRM overheating and CPU throttling, negating the performance you paid for. Always match your CPU's power requirements to your motherboard's VRM capability. A $150 board is not designed to sustain 250W of continuous power delivery.
The chipset is the secondary hub on your motherboard that manages I/O operations -- SATA ports, USB controllers, secondary PCIe lanes, audio, networking, and other peripherals. While it generates considerably less heat than the CPU or VRM, it still requires cooling, especially on higher-end chipsets that manage more lanes and features.
Most motherboards use a passive aluminum heatsink over the chipset, which is sufficient for the vast majority of builds. The heatsink absorbs heat from the chipset die and dissipates it into the surrounding air through natural convection and whatever case airflow passes over it.
Some high-end motherboards add a small active fan to the chipset heatsink. This was more common on older X570 boards from AMD, where the chipset ran noticeably warm due to its PCIe 4.0 support. Current-generation chipsets like Intel Z790 and AMD X670E run warmer than their budget counterparts (B760 and B650) because they manage more PCIe lanes, but they still typically stay within safe limits with passive cooling alone.
Chipset cooling is rarely a concern for most builders. Unless your case has extremely poor airflow or no air movement over the motherboard at all, the chipset heatsink that comes with your board will do its job. If you see chipset temperatures above 80-90C in monitoring software, improving your overall case airflow will resolve the issue.
NVMe SSDs are compact, high-performance storage devices that pack a lot of speed into a very small form factor. That speed comes at a cost: NVMe drives generate considerable heat, particularly during sustained sequential read and write operations like large file transfers, game installations, or video editing workflows. Without adequate cooling, an NVMe SSD will thermal throttle, reducing its speed to prevent damage to the flash memory and controller.
Most modern motherboards (mid-range and above) include M.2 heatsinks as standard equipment. These typically consist of:
PCIe Gen 5 NVMe drives deserve special attention. These drives can reach sequential speeds exceeding 14,000 MB/s, but they generate significantly more heat than Gen 4 drives. For Gen 5 NVMe SSDs, a heatsink is not optional -- it is essential for the drive to sustain anywhere near its rated performance. Some Gen 5 drives ship with their own heatsinks for this reason.
If your motherboard doesn't include M.2 heatsinks, aftermarket ones cost $10-15 and can prevent thermal throttling during large file transfers. They are one of the cheapest and most effective upgrades you can make to protect your drive's performance and longevity.
Fan headers are the connectors on your motherboard that power and control the fans and pumps in your system. Understanding the different types of headers helps you plan your cooling setup and ensure you have enough connections for all your fans.
Here are the standard fan header types you will find on modern motherboards:
| Header Type | Pin Count | Features |
|---|---|---|
| CPU_FAN | 4-pin | PWM speed control, mandatory for CPU cooler. Board may show a warning or refuse to boot if this header is empty. |
| CPU_OPT | 4-pin | Secondary CPU fan header. Follows the same fan curve as CPU_FAN. Use this for a second fan on a dual-fan tower cooler. |
| SYS_FAN / CHA_FAN | 4-pin | Case fan headers, individually controllable through BIOS or software. Each header can typically supply up to 1A (12W). |
| AIO_PUMP | 4-pin | Designed for AIO liquid cooler pumps. Defaults to a higher base RPM to keep the pump running reliably at all times. |
| W_PUMP+ | 4-pin | For custom loop water cooling pumps. Can deliver up to 3A (36W) and runs at full speed by default to ensure consistent coolant flow. |
The number of fan headers on a motherboard scales with its price tier:
If your motherboard doesn't have enough fan headers for all your case fans, use a PWM fan hub or splitter. These let you control 3-6 fans from a single motherboard header. The fans will all follow the same speed curve, but this is perfectly fine for case fans that serve the same airflow purpose. Just make sure the total current draw of all connected fans doesn't exceed the header's rated capacity (usually 1A for SYS_FAN headers).
Choosing a CPU cooler involves more than just picking one with enough cooling capacity. Physical compatibility between the cooler, motherboard, RAM, and case is critical. Here are the five compatibility checks you need to make before buying:
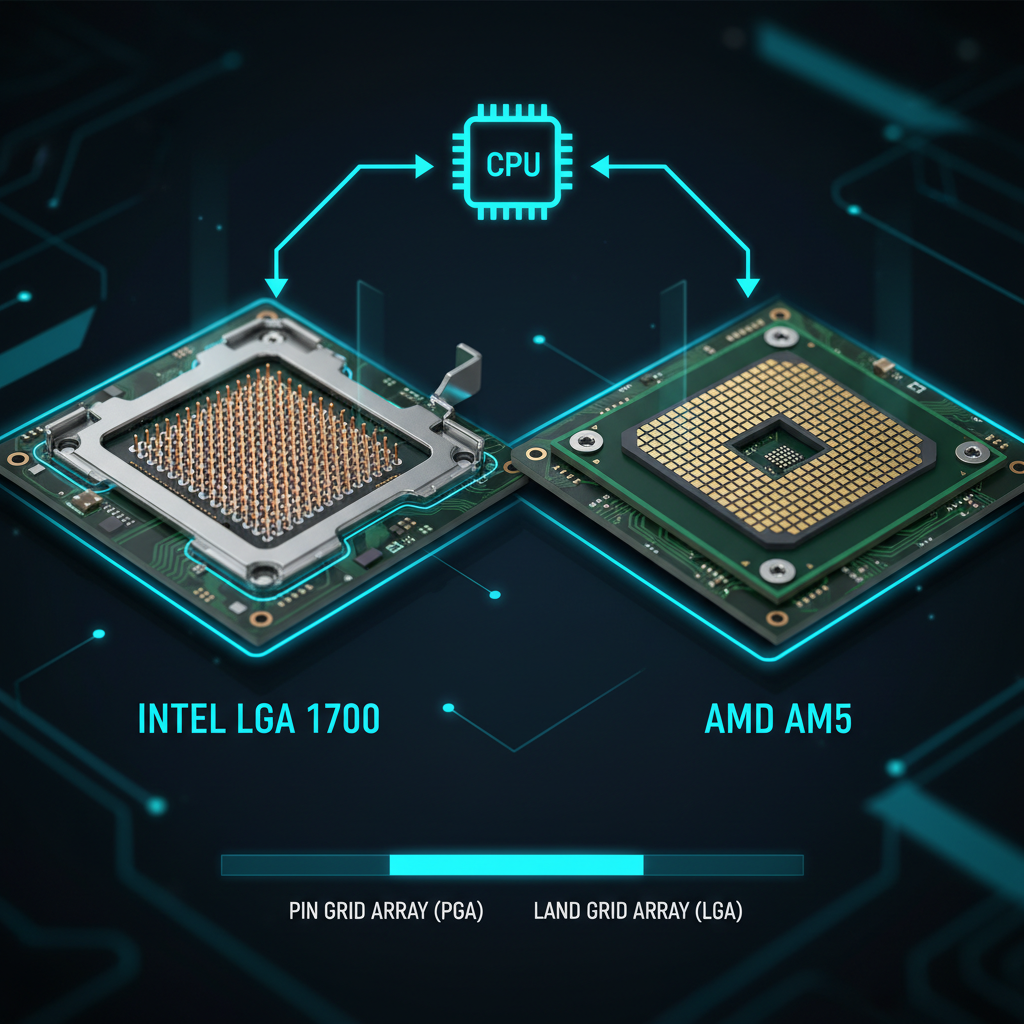
The cooler must support the socket on your motherboard. Modern coolers need to support LGA 1700 (Intel 12th/13th/14th Gen), LGA 1851 (Intel Core Ultra), or AM5 (AMD Ryzen 7000/9000) depending on your platform. Most quality coolers include mounting hardware for multiple sockets, but always verify before purchasing. Some older coolers may require a free adapter bracket from the manufacturer for newer sockets.
Large tower coolers extend outward from the CPU socket and can overhang the first DIMM slot. If your RAM modules have tall heat spreaders (anything over 40mm), they may physically collide with the cooler. Check the cooler's RAM clearance specification and compare it to your memory's height. Low-profile RAM kits exist specifically for builds where tower cooler clearance is tight.
Some large tower coolers -- particularly dual-tower designs like the Noctua NH-D15 -- can interfere with the VRM heatsinks on the motherboard. These heatsinks sit directly adjacent to the CPU socket, and a cooler that extends too far in that direction may not seat properly. Review photos and compatibility lists from both the cooler and motherboard manufacturer to catch conflicts before they become a problem on your workbench.
Every PC case has a maximum CPU cooler height specification, typically listed in the case's specs as "CPU cooler clearance" or "max cooler height." Tower coolers range from around 120mm to over 165mm tall. If your cooler is taller than your case allows, the side panel will not close. Measure twice, buy once.
If you are using an AIO (All-in-One) liquid cooler, verify that your case supports the radiator size you want. Common radiator sizes are 120mm, 240mm, 280mm, and 360mm. Check not only whether your case has the mounting points, but also whether there is enough clearance between the radiator mounting location and other components like the motherboard, RAM, or top-mounted fans. Front-mount radiators are generally the easiest to install and provide the best CPU cooling performance.
Even the best motherboard cooling solutions rely on adequate case airflow to work. Without fresh air moving across VRM heatsinks, chipset coolers, and M.2 heatsinks, heat simply accumulates inside the case and every component runs hotter. Here are the fundamental principles of effective airflow planning:
The standard and most effective airflow pattern is front-to-back and bottom-to-top. Cool air enters through intake fans at the front (and optionally the bottom) of the case, flows over your components absorbing heat, and exits through exhaust fans at the rear and top. This works with the natural tendency of hot air to rise and creates a consistent, predictable airflow path.
If you are using a tower air cooler, orient it so it pushes air toward the rear exhaust fan. Most tower coolers are designed to be installed with the fan facing the front of the case, pulling cool intake air through the heatsink fins and pushing warm air toward the back. This aligns the cooler's airflow with the overall case airflow pattern rather than fighting against it.
Running slightly more intake fans than exhaust fans creates positive air pressure inside the case. This means air is gently pushed out through every gap and opening in the chassis rather than being sucked in. The benefit is significant: with positive pressure, air only enters through your filtered intake fans, which dramatically reduces dust accumulation inside the case. Negative pressure (more exhaust than intake) pulls unfiltered air through every crack and seam, bringing dust with it.
Your case's front panel design has a massive impact on airflow. Mesh front panel cases allow unrestricted air intake and consistently outperform solid front panel cases by 5-15C on CPU and GPU temperatures. If thermal performance is a priority, choose a case with a mesh or perforated front panel. Cases with solid glass or metal front panels may look sleek, but they restrict the very airflow your components depend on.
Proper cable management is not just cosmetic -- it improves airflow. Route cables behind the motherboard tray using the cable management cutouts and tie-down points in your case. Bundles of cables blocking the airflow path between intake and exhaust fans create turbulence and dead zones where heat accumulates. A clean cable routing job keeps the main chamber open for smooth, unobstructed airflow.
Here are practical, actionable tips for monitoring and maintaining optimal temperatures in your system:
Use HWiNFO64 (free) to monitor CPU, VRM, chipset, and SSD temperatures in real time. This is the most comprehensive hardware monitoring tool available for Windows and gives you detailed sensor readings from every component on your motherboard. Run it while gaming or during heavy workloads to see your actual thermal performance, not just idle temperatures.
24+1 phases
22+2+1 phases
22+1+1 phases
20+2+1 phases
Continue building your knowledge with these related guides:
Everything about Intel LGA 1700, AMD AM5, and how to pick the right motherboard socket for your processor.
7 min read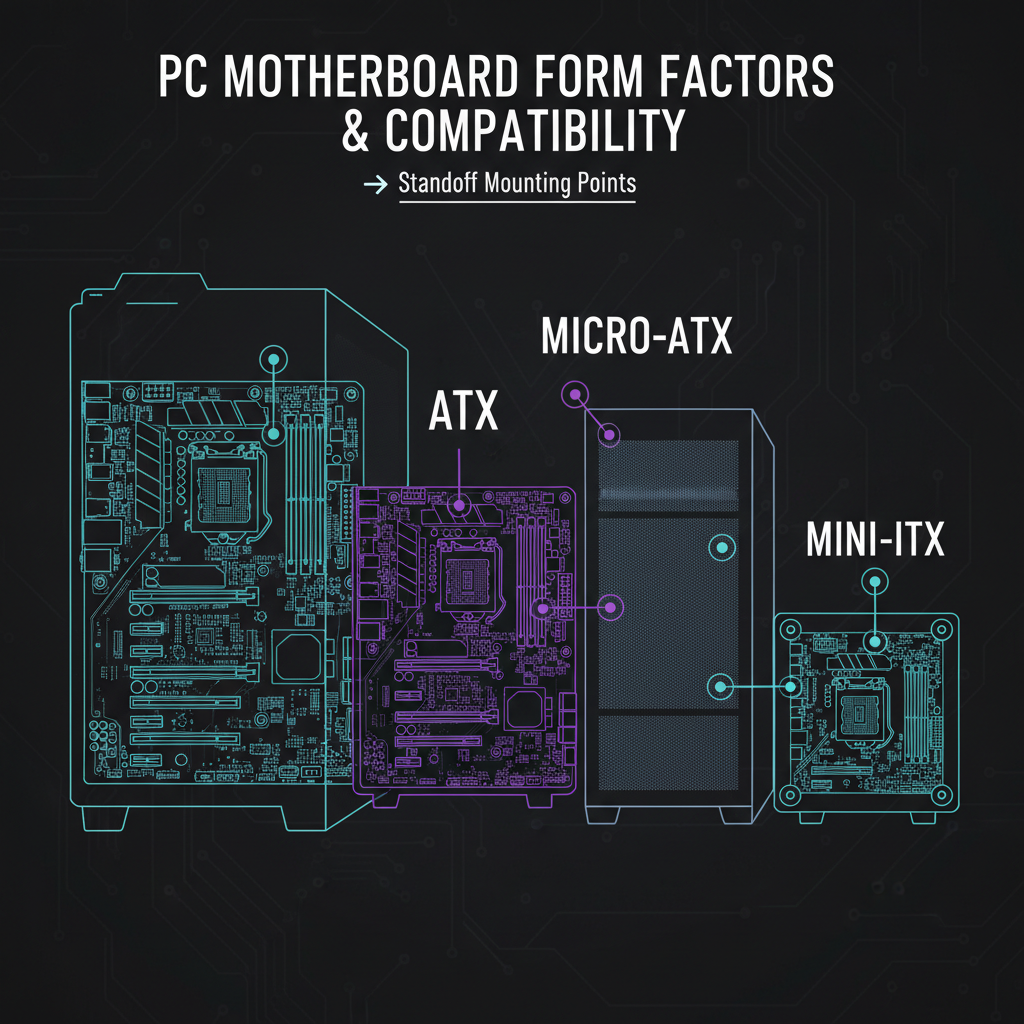
ATX, Micro-ATX, and Mini-ITX case sizing, airflow design, and choosing the right case for your motherboard.
8 min read